Foglight Rewire
") By default, the factory wiring for the foglights (in the US) are set to only come on when the headlights are on. I suppose there was a reason, though in Canada, the supra’s foglights were on all the time, as “saftey lights” or something. A supra mk3, with JUST the foglights on, is a sight to behold. it’s damn sexy. I decided i wanted my foglights to be switched (so they are only on when the key is set to the “on” position) but otherwise i want total control of when they’re on and off. Ideally i wanted to just leave the switch on all the time, so that the fog lights are on whenever the car is running, but i also want control to turn them off if i feel like it. (Read on for step by step instructions.)
By default, the factory wiring for the foglights (in the US) are set to only come on when the headlights are on. I suppose there was a reason, though in Canada, the supra’s foglights were on all the time, as “saftey lights” or something. A supra mk3, with JUST the foglights on, is a sight to behold. it’s damn sexy. I decided i wanted my foglights to be switched (so they are only on when the key is set to the “on” position) but otherwise i want total control of when they’re on and off. Ideally i wanted to just leave the switch on all the time, so that the fog lights are on whenever the car is running, but i also want control to turn them off if i feel like it. (Read on for step by step instructions.)
My stipulations were that the power to the foglights was switched, I get use of the same (factory) fog light switch to control them, and use the same relay. Luckily IdealSupra wrote up a step by step to do exactly what i was looking for. (Posted to supraforums.com, but you must be a member, so i’m mirroring the steps here.) Even more helpful than that, Dylan Wiggins posted pictures of every step, with annotations. It’s super easy to follow, available here. However, because i dont trust other websites to be there when they’re needed, i’m mirroring the steps and info here.
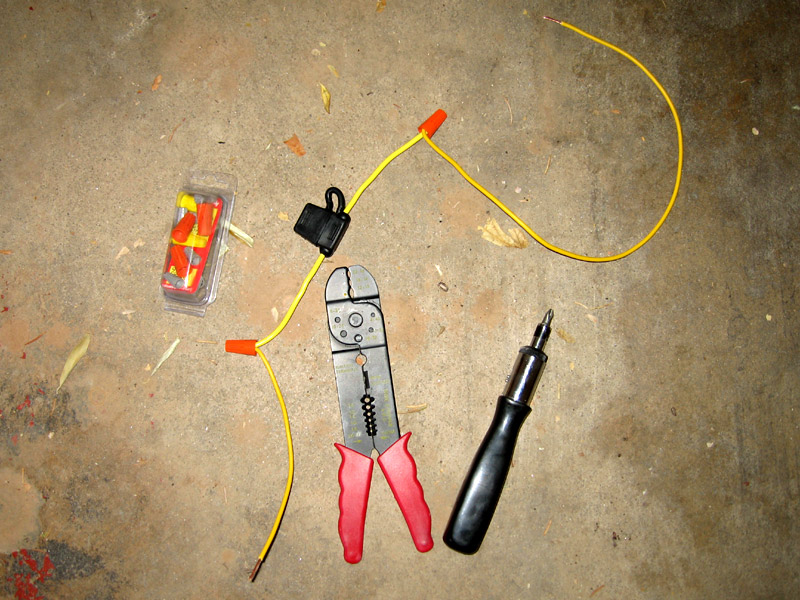 First, grab your tools and parts. You’ll need Wire Cutters, Wire Strippers, Electrical Tape, and a Phillips Screwdriver. As for parts, grab some Wire, Screw Caps (for splicing) and an Inline Fuse (15A). What’s going to happen is that you’re going to ground the Foglight switch to a different ground (that isn’t attached to the headlights in any way) and then pull power to the Foglight Relay from a switched (and an we’ll make it inline-fused) power source.
 The following steps are from IdealSupra’s writeup, but reordered to how i did it.
Prep 1: Remove screw underneath the defroster / foglight etc. switch panel. Pull the switch panel away from dash and unplug the harnesses. Make sure you have a white with black stripe wire coming off the defroster switch. Also find the red with green stripe wire from the foglight switch. (I’ve heard 87s are wired differently, or use different color codes or something. just find these and make sure.)
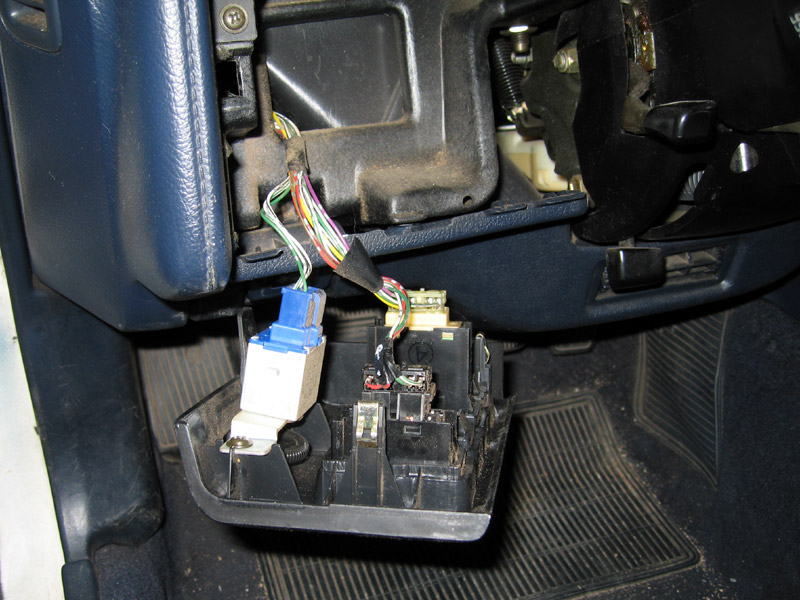
Prep 2: Pull left kick panel and lower steering column (the part with the air vent) off. There are 3 screws (4 if you include the one you already removed to get the switch panel out) and you might or might not have to unscrew 2 screws behind the hood release lever. (i did.) Find the Fog Light Relay (consult the TSRM if you can’t find it… it’s up and out pretty deep.)
Now we’re ready to start cutting and splicing!
Step 1: Cut the white with black stripe wire on the defroster switch… leaving enough room on both sides to strip it and put it back together.
Step 2: Cut the red with green stripe wire on back of foglight switch. Leave Enough slack from switch to strip and splice. Tape off the other end going into the dash.
Step 3: Splice together the red with green stripe wire coming from foglight switch with BOTH ends of the white with black stripe wire that you cut on the defroster switch. This creates a seperate ground for the Fog light switch.
Step 4: Secure splice and make sure it’s strong. (You dont want it to come loose after 2 weeks of bumpy roads.)
Now we’re finished with the switch panel portion! go smoke a cigarette. This next part is where you strain your back.
Step 5: Locate the Fog Light Relay. Pull the connector off the back of it. Locate the red with black stripe wire. (With the extra plastic harness part sticking off to the right, it’s the wire that goes into the top-right terminal.) Give the wire as much slack as possible off the connector and cut it. (It’s tight, but the more slack off the connector the better.)
Step 6: Tape off the wire going into the dash and strip the wire coming from the connector. If neccessary add an extension wire so that the red with black stripe wire reaches the Junction block by the fuse area. Or to at least about 3 inches from it as the inline fuse will make up for that with that wire. (it’s only maybe 8 inches away at most.) 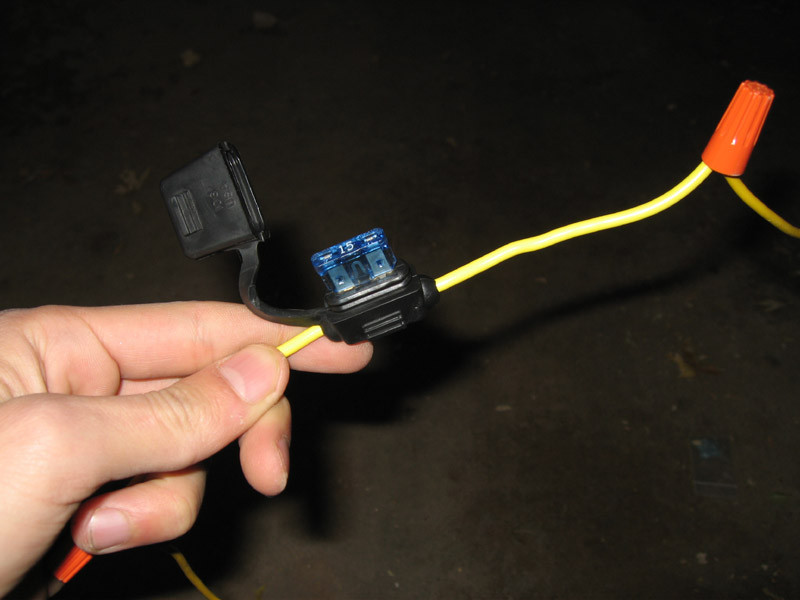
Step 7: Put the fuse in the inline fuse and attach the wire coming off it to the red with black stripe wire coming from the relay connector.
Step 8: Choose a constant 12v fuse to place the Inline fuse. I chose the Cig Lighter fuse because i never use it and i have other things coming off my IGN fuse. You can use the IGN fuse if you would like. As long as its a constant 12v when the keys in the on position. Not sure? Use a test light or voltmeter to find out. Plug Inline fuse into chosen fuse location. (or wire lead into the fuse location with the 15A fuse as well.)
Step 9: Test your work. You should now be able to turn JUST yuor fog lights on without anything else being on. Key in the on position and you have your fog lights at your mercy
Step 10: Replace panels and enjoy your new rewired fog lights!
Project Complete!
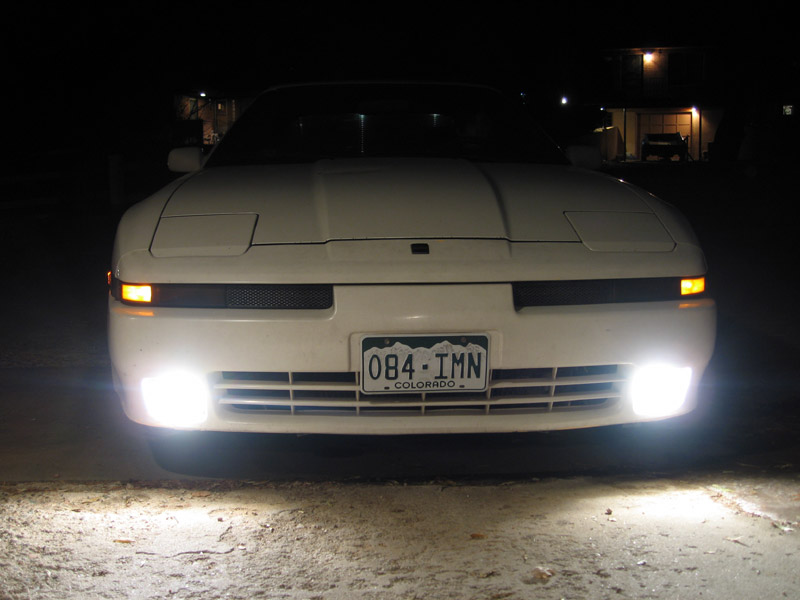 Beautiful. …and safe too! Now i can have JUST the foglights on, or pretty much any other combination.
resources used: IdealSupra’s writeup at supraforums.com, and Dylan Wiggin’s step by step pictoral guide.